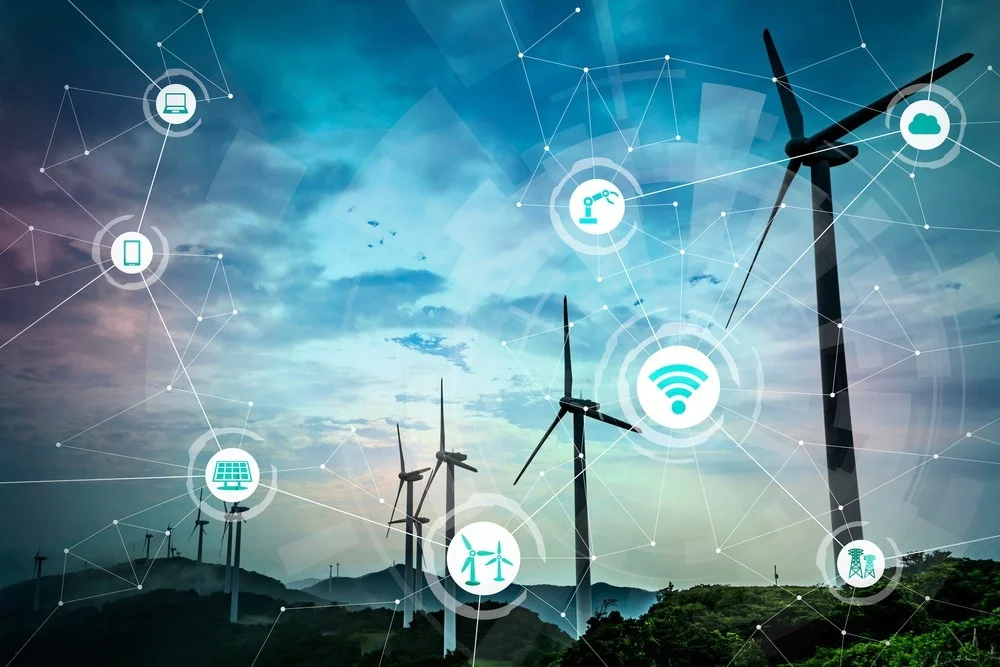
Internet of Things - an Introduction

IoT is penetrating our life much faster than we can imagine. Especially if you are not lost in the AI Bubble, you will see that this is the real domain where you can invest your time and money.
This blog gives you a high level overview of most of the core concepts involved.
The Internet of Things: Beyond Connected Toasters
Your refrigerator just texted you. Not because it’s gained sentience (yet), but because it noticed you’re low on milk. Meanwhile, across town, a traffic light adjusted its timing based on real-time congestion data, and a factory predicted equipment failure three days before it would have cost millions in downtime.
Welcome to the Internet of Things—a world where the digital and physical blur into something far more practical and transformative than the smart home gadgets that typically dominate the conversation. If you think IoT is just about Alexa turning on your lights, you’re missing the revolution happening in warehouses, hospitals, farms, and cities worldwide.
Let’s dive deep into what IoT really means for developers, engineers, and businesses building the connected future.
IoT Use Cases: Far Beyond the Smart Home
While consumer IoT gets the headlines, the real action is happening in sectors where connected devices solve complex, high-stakes problems:
Industrial IoT (IIoT)

Every industry needs IoT in some form or the other. Be it manufacturing or sales, IoT has a role to play in your life.
- Predictive Maintenance: Vibration sensors on manufacturing equipment detect anomalies in bearing performance, predicting failures weeks in advance. GE’s Predix platform saves airlines millions by preventing unscheduled maintenance.
- Digital Twins: Virtual replicas of physical assets enable real-time simulation and optimization. Siemens uses digital twins to optimize everything from gas turbines to entire factories.
- Supply Chain Visibility: Asset tracking from factory floor to end customer, providing real-time location, condition monitoring (temperature, humidity, shock), and ETA predictions.
Healthcare IoT

Healthcare is another important domain that was invaded by technology in the recent years. It is no more limited to doctors prescribing medicines. Healthcare is now more of IoT than anything else.
- Remote Patient Monitoring: Wearable ECG monitors, continuous glucose monitors, and smart inhalers that transmit data directly to healthcare providers, reducing hospital readmissions by up to 50%.
- Hospital Asset Tracking: RTLS (Real-Time Location Systems) tracking expensive equipment like infusion pumps and wheelchairs, reducing search time and capital expenditure.
- Cold Chain Monitoring: Temperature sensors ensuring vaccine and medication integrity throughout the supply chain—critical infrastructure that proved essential during COVID-19 vaccine distribution.
Smart Agriculture (AgTech)
Always thankful for the food we eat, IoT has driven a good level of revolution in the world of agriculture and food industry as a whole.
- Precision Irrigation: Soil moisture sensors combined with weather data to optimize water usage, reducing consumption by 30-50% while increasing crop yields.
- Livestock Monitoring: Wearable sensors on cattle detecting early signs of illness, estrus cycles, and behavioral patterns that indicate welfare issues.
- Autonomous Farm Equipment: GPS-guided tractors and drones for planting, spraying, and harvesting with centimeter-level precision.
Smart Cities & Infrastructure

This is the most advertised and fantasized application of IoT.
- Adaptive Traffic Management: Connected traffic lights that respond to real-time traffic patterns, reducing congestion by up to 25% in cities like Barcelona and Singapore.
- Smart Parking: Sensors detecting available parking spaces, reducing the 30% of urban traffic caused by people searching for parking.
- Structural Health Monitoring: Sensors embedded in bridges, tunnels, and buildings detecting stress, vibration, and material degradation before failures occur.
Energy & Utilities
Devices do what humans can’t
- Smart Grid Management: Distributed sensors optimizing power distribution, detecting outages in real-time, and integrating renewable energy sources more efficiently.
- Smart Meters: Real-time energy consumption data enabling dynamic pricing, demand response programs, and consumer insights.
- Pipeline Monitoring: Pressure and leak detection sensors across thousands of miles of oil, gas, and water pipelines.
Retail & Logistics
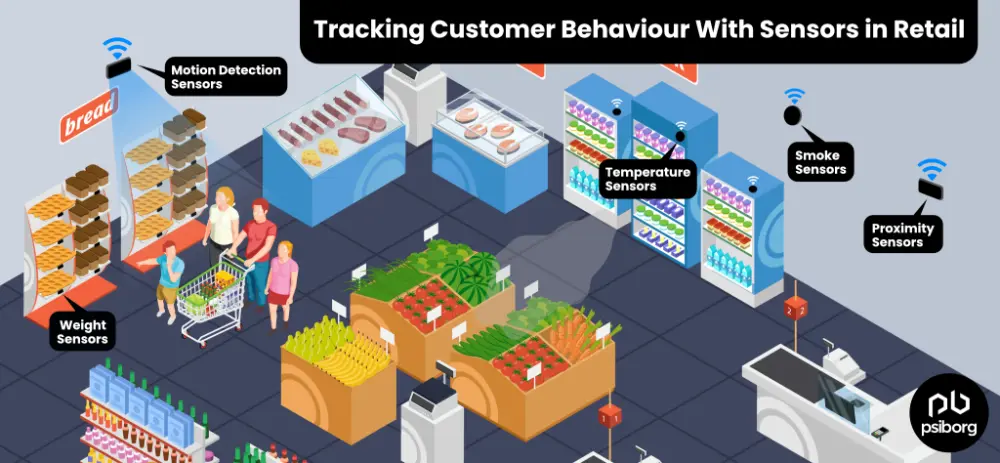
Another major part of the world - where tracking is absolutely essential! IoT has simplified several complexities of the world of logistics.
- Inventory Management: RFID tags providing real-time inventory accuracy, reducing stockouts and overstock situations.
- Fleet Management: GPS tracking, driver behavior monitoring, route optimization, and fuel efficiency analytics across commercial vehicle fleets.
- Environmental Monitoring: Temperature and humidity tracking in cold storage and during transport, ensuring compliance and quality.
Environmental Monitoring
If we can’t measure it, we can’t improve it. IoT has enabled us track the climatic changes - helping us educate ourselves in the different ways of improving it.
- Air Quality Networks: Dense networks of pollution sensors providing hyperlocal air quality data for public health and urban planning.
- Wildlife Tracking: Connected collars and tags monitoring endangered species movements, population dynamics, and ecosystem health.
- Disaster Early Warning: Seismic sensors, flood level monitors, and weather stations providing early warning for natural disasters.
Common Challenges in Developing IoT Applications
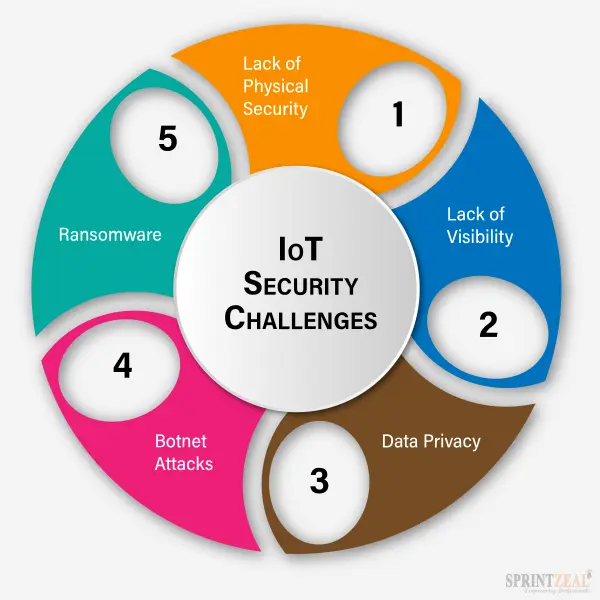
Building IoT solutions is not just about connecting devices—it’s about overcoming a unique combination of hardware, software, networking, and operational challenges:
Connectivity & Network Challenges
When you see the mobile phone has a weak network signal, you can always jump over to another place where you see good network signal. But that is not so easy for devices that are supposed to do their work at the defined place. The designers have to make sure they will get the required network bandwidth at the right location.
Bandwidth Constraints: Many IoT devices operate in low-bandwidth environments. Designing efficient data transmission protocols and implementing edge computing to reduce data volume is critical.
Network Reliability: Devices may operate in areas with intermittent connectivity. Implementing store-and-forward mechanisms, offline operation capabilities, and graceful degradation is essential.
Protocol Diversity: MQTT, CoAP, HTTP, LoRaWAN, NB-IoT, Zigbee—choosing the right protocol for your use case and potentially supporting multiple protocols adds complexity.
Security Concerns
The word Internet is synonymous to Hackers. You can’t have anything connected to the internet without hackers eager to exploit it. The designers should make sure the devices and their data is secure.
Device Authentication: Securely provisioning and authenticating thousands or millions of devices without exposing credentials is a significant challenge.
Data Encryption: End-to-end encryption from device to cloud while managing the computational constraints of resource-limited devices.
Firmware Updates: Securely distributing and verifying over-the-air (OTA) firmware updates without bricking devices or creating vulnerabilities.
Physical Security: Devices deployed in the field are vulnerable to physical tampering, extraction of credentials, and hardware attacks.
Power Management
A device is as productive as its batteries. The device and its functionality should be implemented in a way that it does not consume too much power, and the batteries do not require frequent recharge.
Battery Life: Many IoT devices run on batteries that should last years. Optimizing sleep modes, transmission frequency, and computational efficiency is crucial.
Energy Harvesting: Implementing solar, kinetic, or RF energy harvesting while ensuring reliable operation across varying conditions.
Power Supply Stability: Dealing with voltage fluctuations, power loss, and brown-out conditions in industrial environments.
Scalability Issues
What works for one, rarely works for many - unless it is designed with “many” in mind. Scalability is another major challenge for the designers to manage.
Device Management: Managing firmware versions, configurations, and health monitoring across thousands or millions of heterogeneous devices.
Data Volume: Processing and storing massive amounts of time-series data—a single factory might generate terabytes daily.
Backend Infrastructure: Designing cloud architecture that scales elastically while controlling costs as your device fleet grows.
Interoperability & Standards
There are many standardizations and forums that promote these standards. But the problem is that there are many of them! Not every device is compatible with the other. That brings in another set of problems for the designers to track and manage.
Legacy System Integration: Connecting modern IoT systems with legacy industrial protocols (Modbus, BACnet, PROFIBUS) and equipment.
Vendor Lock-in: Avoiding proprietary ecosystems while leveraging platform capabilities. Balancing standardization with innovation.
Data Format Standardization: Ensuring different device types and vendors can communicate effectively through standardized data models.
Environmental & Operational Constraints
These devices are often meant to go where humans can’t. And that includes extreme operational conditions. It is important that the designer tracks these to make sure the device can stand the operating conditions
Extreme Conditions: Designing devices that operate reliably in temperatures from -40°C to 85°C, high humidity, vibration, dust, and corrosive environments.
Certification & Compliance: Meeting industry-specific certifications (UL, CE, FCC, ATEX) and regulations (GDPR, HIPAA, FDA).
Maintenance & Serviceability: Designing for field replacement, remote diagnostics, and minimal maintenance over 5-10+ year lifecycles.
Development Complexity
And ofcourse! IoT is never isolated from the rest of the world. IoT development requires expertise in many domains. It is very difficult to put them all together, and get the entire system working.
Cross-functional Requirements: IoT development requires expertise in embedded systems, networking, cloud architecture, data science, and often domain-specific knowledge (e.g., industrial automation, healthcare).
Testing Challenges: Simulating real-world conditions, network scenarios, and edge cases in development environments is difficult and expensive.
Time-to-Market Pressure: Balancing rapid prototyping and MVP development with the robustness required for production deployments.
Common Types of IoT Devices: The Hardware Spectrum
IoT devices span a remarkable range of capabilities, from passive tags costing pennies to sophisticated edge computing platforms:
Passive Identification Devices
These devices respond to events. They don’t have any source of power, or logic on them. They just reflect the incoming energy from the RF signals or beams.
RFID Tags: Passive tags powered by reader RF energy, used for inventory tracking, access control, and supply chain management. Read ranges from centimeters (NFC) to meters (UHF RFID).
NFC Tags: Near-field communication tags enabling contactless payments, smart posters, and device pairing.
Sensors & Actuators
These devices have the basic ability to interact with the surroundings. They have some hardware builtin that behaves differently under different conditions. This helps them measure and record the specific parameters
Sensor Nodes: Single-purpose devices measuring temperature, humidity, pressure, motion, light, sound, or chemical properties. Often battery-powered with years of operational life.
Smart Sensors: Sensors with embedded processing capabilities, performing edge analytics, filtering, and calibration locally.
Actuators: Devices that perform physical actions—valves, motors, locks, switches—controlled remotely or based on sensor input.
Microcontroller-Based Devices
Now, devices are not restrictred to measurements alone. Now, they can process those raw values, apply some logic and report some smart updates. Doing so, significantly reduces the network load and power consumtion - on the other hand, it increases the cost of each device.
Arduino Ecosystem: ATmega and ARM-based boards excellent for prototyping and educational projects. Limited processing power but extremely power-efficient.
ESP32/ESP8266: Low-cost microcontrollers with built-in Wi-Fi and Bluetooth, powering countless DIY and commercial IoT products.
STM32 Family: ARM Cortex-M microcontrollers offering various performance levels, widely used in industrial and commercial applications.
Single-Board Computers
As the complexity of the computation on device increased, we got better and higher capabilities in these devices.
Raspberry Pi: ARM-based Linux computers offering full OS capabilities, perfect for edge computing, video processing, and complex IoT gateways. Models range from the power-efficient Raspberry Pi Zero to the powerful Raspberry Pi 5.
BeagleBone: Similar to Raspberry Pi but with more GPIO options and real-time processing capabilities, favored in industrial applications.
NVIDIA Jetson: High-performance ARM + GPU platforms designed for AI inference at the edge, enabling computer vision and machine learning applications.
Industrial Controllers
At times, computation is not the only requirement. The device should be able to sustain extremes. The industrial controllers are made to be rugged and capable of surviving the rough conditions.
PLCs (Programmable Logic Controllers): Ruggedized industrial controllers designed for factory automation, process control, and harsh environments. Brands like Siemens, Allen-Bradley, and Mitsubishi dominate this space.
PACs (Programmable Automation Controllers): More flexible than traditional PLCs, combining PLC reliability with PC-like functionality.
Industrial IoT Gateways: Protocol converters and edge computing platforms bridging legacy industrial equipment with modern IoT platforms.
Communication Modules & Gateways
For devices that need to exhange data with the cloud, we need a good communication with the cloud. We have several options for that.
Cellular IoT Modules: 4G LTE-M, NB-IoT, and 5G modules for wide-area connectivity in remote deployments.
LoRaWAN Gateways: Long-range, low-power wireless gateways covering several kilometers, ideal for smart cities and agriculture.
Zigbee/Thread Coordinators: Low-power mesh networking hubs for smart home and industrial sensor networks.
Edge Computing Gateways: Powerful devices performing data aggregation, preprocessing, and analytics at the network edge before cloud transmission.
Specialized IoT Hardware
With the increase in commercial applications, we have specialized devices for specific usecases.
Wearables: Smartwatches, fitness trackers, medical wearables with specialized sensors (PPG, ECG, accelerometers) and power optimization for all-day wear.
Smart Cameras: AI-enabled cameras performing real-time video analytics for security, traffic monitoring, quality control, and retail analytics.
GPS Trackers: Battery-powered or vehicle-powered tracking devices with cellular connectivity for fleet management and asset tracking.
Environmental Monitors: Multi-sensor devices measuring air quality, noise levels, radiation, or water quality parameters.
IoT Device Comparison Table
Understanding the trade-offs between different device types is crucial for selecting the right hardware for your application:
| Device Type | Processing Power | Connectivity | Power Consumption | Typical Cost | Battery Life | Development Complexity | Best Use Cases |
|---|---|---|---|---|---|---|---|
| RFID Tags (Passive) | None (passive) | NFC/UHF RFID (cm to meters) | Zero (powered by reader) | \(0.05-\)2 | N/A (passive) | Low | Inventory tracking, access control, supply chain |
| NFC Tags | None (passive) | NFC (0-10 cm) | Zero (powered by reader) | \(0.10-\)1 | N/A (passive) | Very Low | Product authentication, smart posters, payments |
| Basic Sensor Nodes | 8-16 bit MCU | Zigbee, BLE, LoRaWAN | 0.1-10 mW | \(10-\)50 | 1-10 years | Low-Medium | Environmental monitoring, simple telemetry |
| Arduino (ATmega) | 8-bit, 16 MHz | None (requires module) | 50-200 mW | \(5-\)30 | Days-weeks | Low | Prototyping, education, simple automation |
| ESP32/ESP8266 | 32-bit, 160-240 MHz | Wi-Fi, Bluetooth | 80-250 mW (active) | \(2-\)10 | Hours-days | Medium | Smart home, Wi-Fi IoT devices, prototypes |
| STM32 MCUs | 32-bit ARM, 48-480 MHz | None (requires module) | 50-500 mW | \(2-\)20 | Varies | Medium-High | Industrial sensors, medical devices, commercial products |
| Raspberry Pi Zero | 1 GHz ARM (single-core) | Wi-Fi, Bluetooth | 0.5-1 W | \(15-\)25 | Hours | Medium | Lightweight edge computing, IoT gateways |
| Raspberry Pi 4⁄5 | 1.5-2.4 GHz ARM (quad-core) | Wi-Fi, Bluetooth, Ethernet | 3-8 W | \(35-\)80 | N/A (needs power) | Medium | Edge computing, computer vision, complex gateways |
| BeagleBone | 1 GHz ARM | Ethernet (varies by model) | 2-5 W | \(50-\)80 | N/A (needs power) | Medium-High | Industrial automation, real-time control, robotics |
| NVIDIA Jetson Nano | Quad-core ARM + 128-core GPU | Wi-Fi, Ethernet | 5-10 W | \(100-\)150 | N/A (needs power) | High | AI inference, computer vision, autonomous systems |
| NVIDIA Jetson AGX | 8-12 core ARM + GPU | Wi-Fi, Ethernet | 10-30 W | \(400-\)1,500 | N/A (needs power) | High | Advanced AI, multi-camera processing, robotics |
| Industrial PLCs | Varies (specialized processors) | Ethernet/IP, PROFINET, Modbus | 5-50 W | \(500-\)5,000+ | N/A (mains powered) | High | Factory automation, process control, critical infrastructure |
| Cellular IoT Modules | 32-bit ARM | 4G LTE-M, NB-IoT, 5G | 100 mW-2 W (varies) | \(20-\)100 | Months-years | Medium | Remote monitoring, fleet tracking, wide-area deployments |
| LoRaWAN Gateways | ARM Linux SBC | LoRa, Ethernet, Cellular | 5-15 W | \(200-\)1,000 | N/A (needs power) | Medium-High | Smart city networks, agricultural monitoring, campus IoT |
| Smart Cameras | ARM + ISP + sometimes AI accelerator | Wi-Fi, Ethernet, PoE | 5-20 W | \(50-\)500 | N/A (needs power) | High | Security, retail analytics, traffic monitoring, quality control |
Key Selection Criteria
On a high level, we can follow these guidelines for choosing the right device for the right purpose
Choose RFID/NFC when you need the lowest cost per device, passive operation, and simple identification without sensing.
Choose basic sensor nodes when battery life (years) is paramount and you’re collecting simple metrics like temperature or door status.
Choose ESP32 when you need Wi-Fi connectivity at low cost and can tolerate higher power consumption or frequent charging.
Choose Raspberry Pi when you need Linux capabilities, moderate computing power, and rapid development with standard programming languages (Python, Node.js).
Choose STM32 or similar MCUs when building production-ready commercial products requiring certification, low power, and predictable real-time behavior.
Choose Jetson platforms when you need to run neural networks at the edge for computer vision, natural language processing, or other AI workloads.
Choose PLCs when operating in industrial environments requiring proven reliability, safety certifications, and integration with existing factory automation systems.
Choose cellular modules when devices are deployed across wide geographic areas without Wi-Fi infrastructure and need reliable connectivity.
The right choice depends on your specific requirements for processing power, connectivity range, power budget, environmental conditions, development timeline, and total cost of ownership across the device lifecycle.
End-to-End IoT Deployment: Smart Factory Predictive Maintenance
Let’s walk through a real-world implementation of predictive maintenance in a manufacturing facility, touching every layer of the IoT stack:
Business Problem
A mid-sized automotive parts manufacturer faces unexpected machine failures costing \(50,000-\)200,000 per incident in lost production and emergency repairs. Their maintenance strategy is reactive (fix when broken) with some time-based preventive maintenance that often replaces parts prematurely.
Solution Architecture
Device Layer
- Deploy vibration sensors (accelerometers) on critical rotating equipment: CNC machines, motors, pumps, compressors
- Use industrial-grade sensors with MEMS accelerometers capable of sampling at 10-20 kHz
- Select devices with IO-Link or industrial Ethernet connectivity for seamless integration
- Each sensor costs $200-500 depending on specifications
Edge Gateway Layer
- Install Siemens SIMATIC IoT2040 edge gateways (or similar industrial gateway) near equipment clusters
- Gateways perform initial signal processing: FFT (Fast Fourier Transform) analysis to extract frequency domain features
- Run edge ML models to detect anomalies in vibration signatures locally, reducing false positives
- Aggregate data from 20-50 sensors per gateway, transmitting only anomalies and statistical summaries to reduce bandwidth
Connectivity Layer
- Use industrial Ethernet (PROFINET or EtherNet/IP) for sensor-to-gateway communication within the factory
- Implement cellular LTE backup for internet connectivity redundancy
- MQTT protocol for gateway-to-cloud communication, using TLS encryption
- Configure quality-of-service levels: critical alarms use QoS 2, routine telemetry uses QoS 1
Cloud Platform Layer
- Deploy on AWS IoT Core or Azure IoT Hub for device management and ingestion
- Device fleet management: provision devices, manage certificates, push firmware updates
- Data ingestion layer handles 500,000+ messages per day
- Store raw time-series data in InfluxDB or TimescaleDB for efficient querying
- Stream processing using Apache Kafka or AWS Kinesis for real-time analysis
Analytics & ML Layer
- Train machine learning models using historical vibration data and failure records
- Implement multiple algorithms: isolation forests for anomaly detection, LSTM networks for sequence prediction
- Features extracted: RMS velocity, peak acceleration, kurtosis, specific frequency bands indicating bearing wear, misalignment, imbalance
- Models deployed both at edge (fast response, basic detection) and cloud (sophisticated analysis, model training)
- Prediction output: probability of failure within 7, 14, 30 days for each asset
Application Layer
- Web dashboard for maintenance managers showing asset health scores, predicted failures, maintenance recommendations
- Mobile app for technicians with work orders, asset history, and real-time diagnostics
- Integration with existing CMMS (Computerized Maintenance Management System) for work order creation
- Notification system: email, SMS, and Slack alerts for critical anomalies
Integration Layer
- REST APIs exposing equipment health data to ERP and MES systems
- Webhooks triggering automated processes: creating purchase orders for replacement parts, scheduling maintenance windows
- Data export to BI tools (Tableau, Power BI) for executive reporting
Implementation Timeline
Phase 1 (Weeks 1-4): Pilot Deployment
- Install sensors on 10 critical machines
- Deploy single edge gateway
- Set up cloud infrastructure and basic dashboard
- Baseline data collection
Phase 2 (Weeks 5-12): Model Development & Validation
- Collect normal operation data across varying loads and conditions
- Label historical failure events
- Train and validate ML models
- Tune alert thresholds to minimize false positives
Phase 3 (Weeks 13-24): Facility-Wide Rollout
- Scale to 200+ machines across the facility
- Deploy 6 additional edge gateways
- Train maintenance staff on new workflows
- Integrate with existing maintenance systems
Phase 4 (Ongoing): Optimization & Expansion
- Continuous model refinement based on new failure data
- Add additional sensor types: temperature, acoustic emission, current sensors
- Expand to additional facilities
- Implement automated maintenance scheduling
Results After 12 Months
- 87% reduction in unplanned downtime from equipment failures
- $1.2M saved in avoided catastrophic failures and emergency repairs
- 35% reduction in maintenance costs through optimized parts replacement
- 23% increase in overall equipment effectiveness (OEE)
- ROI achieved within 8 months
- Average prediction lead time: 18 days before failure
Key Technical Learnings
- Edge processing is essential: Transmitting raw vibration data (10kHz sampling) would consume 8.6 GB per sensor per day. Edge FFT analysis reduced this by 99.7%.
- Domain expertise matters: False positives decreased by 70% after incorporating mechanical engineering expertise into feature selection.
- Start simple, iterate: Initial deployment used simple statistical thresholds. ML models were added once sufficient training data was collected.
- Security is non-negotiable: Implemented network segmentation, certificate-based authentication, and encrypted communications to prevent OT/IT security risks.
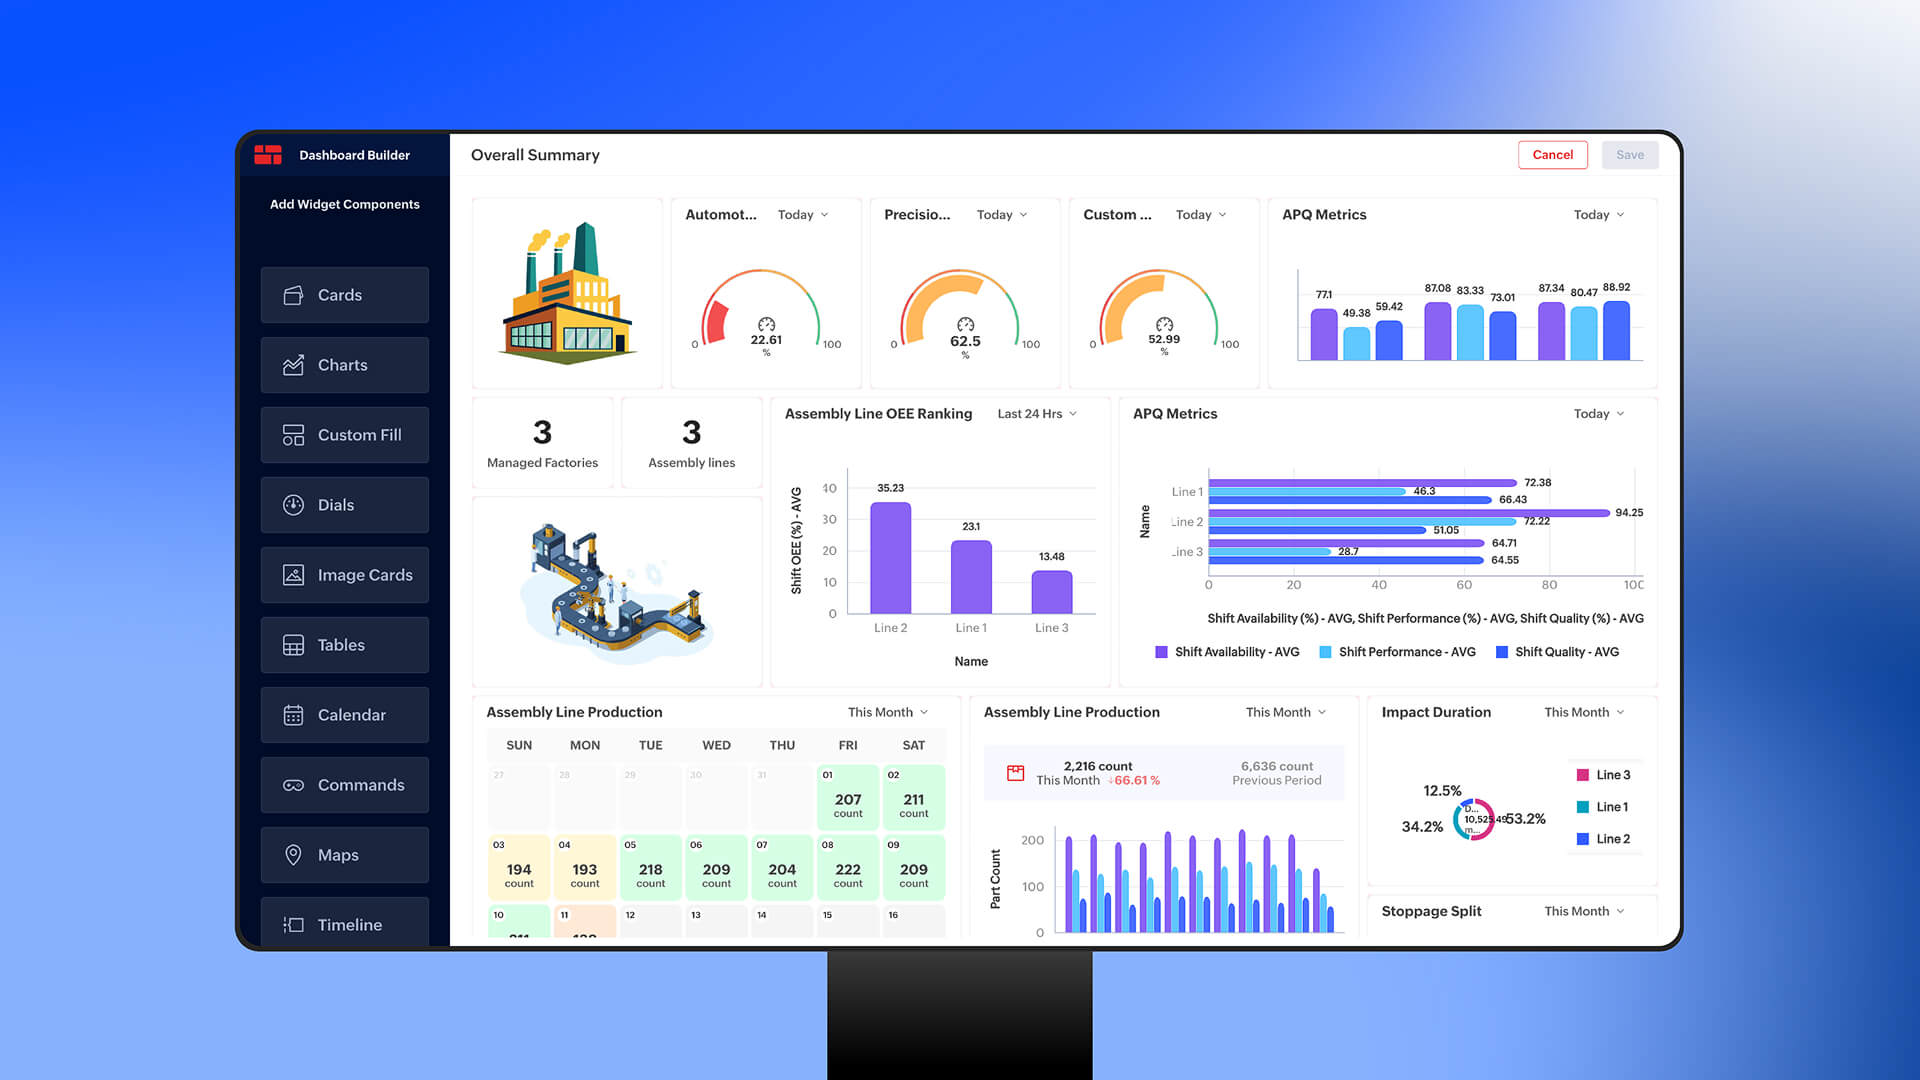
IoT Dashboards
Imagine managing hundreds of temperature sensors across multiple warehouses, each generating data every few seconds. Without a centralized dashboard, monitoring device health, detecting anomalies, and responding to critical alerts would be nearly impossible. IoT dashboards serve as the command center for your connected ecosystem, providing:
Real-Time Visibility: Monitor all devices from a single interface, regardless of their physical location or network. See what’s happening across your entire IoT deployment at a glance.
Proactive Problem Detection: Set up automated alerts and threshold monitoring to catch issues before they escalate into costly failures. Dashboards visualize trends that help predict equipment downtime and maintenance needs.
Data-Driven Decision Making: Transform streams of sensor data into meaningful KPIs, trends, and patterns. Make informed decisions based on comprehensive analytics rather than gut feeling.
Operational Efficiency: Reduce the need for manual checks and on-site visits. Remote monitoring and control capabilities save time and resources while improving response times.
Scalability: As your IoT deployment grows from dozens to thousands of devices, a robust dashboard ensures you maintain control and visibility without increasing operational complexity.
Introducing Zoho IoT: Your Low-Code IoT Platform
Zoho IoT is a low-code IoT application enablement platform that allows businesses to connect, develop, and deploy IoT applications effortlessly. What sets Zoho IoT apart in the crowded IoT platform marketplace is its comprehensive approach to the entire IoT lifecycle—from device connectivity to data visualization.
Why Zoho IoT Stands Out
Low-Code Development: Build applications ranging from simple dashboard-only apps to complex enterprise-grade solutions using modeling, visualization, and automation tools without extensive coding.
Protocol Flexibility: Support for standard protocols like HTTPS, MQTT, CoAP, BACnet, LoRaWAN, Bluetooth, and ZigBee ensures compatibility with virtually any device.
Customizable Dashboards: Pre-built widgets display KPIs and allow real-time analysis, tracking, and action on data for optimal operations, with 360-degree monitoring of all IoT devices scattered across different locations and networks.
Advanced Analytics: Built-in analytics capabilities help identify hidden trends, patterns, and bottlenecks in your IoT data, enabling predictive maintenance and forecasting.
Enterprise-Grade Security: TLS protocols secure data exchange between devices and the platform, with strict device authentication using certificates and keys, plus role-based access control to ensure only authorized personnel can access sensitive IoT data.
Seamless Integration: Native integration with the Zoho ecosystem (CRM, Analytics, Creator) and third-party services through APIs expands your IoT application’s capabilities.
Real-World Use Case: Smart Temperature Monitoring System
Let’s walk through a practical implementation: building a smart temperature monitoring system for a pharmaceutical cold storage facility. This scenario requires monitoring multiple refrigeration units across different warehouses, with strict temperature compliance requirements and immediate alerts when thresholds are breached.
Business Requirements
- Monitor temperature and humidity in 20 cold storage units across 3 locations
- Real-time dashboard showing current readings and historical trends
- Automatic alerts when temperature exceeds -20°C or falls below -30°C
- Historical data for compliance reporting
- Remote monitoring from mobile devices
- Predictive maintenance based on compressor performance data
Now, let’s implement this solution step-by-step using Zoho IoT.
Step-by-Step Implementation Guide
Phase 1: Setting Up Your Zoho IoT Account
Step 1.1: Account Creation and Initial Setup
- Navigate to Zoho IoT and sign up for a Zoho IoT account
- Choose the appropriate plan based on your device count (they offer a free tier for testing)
- Once logged in, you’ll land on the Zoho IoT home dashboard
- Complete your organization profile by providing company details and time zone settings
Step 1.2: Accessing the Developer Portal
The Developer Portal is where all the magic happens. This is your workspace for creating device models, designing dashboards, and setting up automation rules.
- From the main dashboard, navigate to Settings > Developer Portal
- Enable developer mode for your organization
- Familiarize yourself with the three main sections: Models, Dashboards, and Automation
Phase 2: Creating Device Models
Device models act as templates that define the structure, data points, and capabilities of your IoT devices.
Step 2.1: Create a New Device Model
- In the Developer Portal, click on Models > Device Models > Create New
- Name your model: “ColdStorageTemperatureSensor”
- Add a description: “Temperature and humidity sensor for pharmaceutical cold storage monitoring”
- Select device type: MQTT (most common for industrial sensors)
- Enable TLS Security for encrypted communication
Step 2.2: Define Data Points
Data points represent the specific measurements your device will send. For our temperature sensor:
Click Add Data Point and configure:
- Name: Temperature
- Data Type: Number (Decimal)
- Unit: Celsius
- Min Value: -40
- Max Value: 10
- Decimal Places: 2
Add a second data point:
- Name: Humidity
- Data Type: Number (Decimal)
- Unit: Percentage
- Min Value: 0
- Max Value: 100
- Decimal Places: 1
Add additional data points:
- CompressorStatus: Boolean (true = running, false = stopped)
- DoorStatus: Boolean (true = open, false = closed)
- LastMaintenanceDate: Date
- DeviceBatteryLevel: Number (0-100)
Step 2.3: Configure Device Commands
Commands allow you to control devices remotely from your dashboard.
Click Add Command > Create custom commands:
- ResetAlarm: Reset temperature alarm status
- RequestDiagnostics: Request device self-diagnostic report
- SetThreshold: Update temperature threshold limits remotely
For each command, define the expected parameters and response format
Step 2.4: Save and Publish the Model
- Review all configurations
- Click Save as Draft to test
- Once validated, click Publish to make the model available in the user application
Phase 3: Device Registration and Connectivity
Step 3.1: Register Individual Devices
- Navigate to User Application > Devices > Add Device
- Select your published model: “ColdStorageTemperatureSensor”
- Fill in device details:
- Device Name: ColdStorage-Unit-01-Warehouse-A
- Unique Identifier: Generate or enter device serial number
- Location: Warehouse A, Bay 1
- Click Generate Credentials - this creates:
- MQTT Username
- MQTT Password/Token
- Connection endpoint URL
- Securely save these credentials - you’ll need them for device configuration
- Repeat this process for all 20 units
Step 3.2: Configure Physical Device or Gateway
Now you need to configure your actual hardware. Zoho IoT provides SDKs for various platforms:
For ESP32/Arduino devices:
// Install Zoho IoT SDK for Arduino from GitHub
// https://github.com/zoho/zoho-iot-sdk-arduino

#include <ZohoIOTSDK.h>
#include <DHT.h>

// MQTT Credentials from Zoho IoT
#define MQTT_SERVER "mqtt.zoho.com"
#define MQTT_PORT 8883
#define MQTT_USER "your-mqtt-username"
#define MQTT_PASSWORD "your-mqtt-token"
#define DEVICE_ID "ColdStorage-Unit-01-Warehouse-A"

// Initialize sensor
#define DHTPIN 4
#define DHTTYPE DHT22
DHT dht(DHTPIN, DHTTYPE);

// Initialize Zoho IoT client
ZohoIoT zohoClient(MQTT_SERVER, MQTT_PORT, MQTT_USER, MQTT_PASSWORD);

void setup() {
  Serial.begin(115200);
  dht.begin();

  // Connect to WiFi
  WiFi.begin("your-ssid", "your-password");
  while (WiFi.status() != WL_CONNECTED) {
    delay(500);
    Serial.print(".");
  }

  // Connect to Zoho IoT
  zohoClient.connect(DEVICE_ID);
  Serial.println("Connected to Zoho IoT");
}

void loop() {
  // Read sensor data
  float temperature = dht.readTemperature();
  float humidity = dht.readHumidity();

  // Create JSON payload
  String payload = "{";
  payload += "\"Temperature\":" + String(temperature, 2) + ",";
  payload += "\"Humidity\":" + String(humidity, 1) + ",";
  payload += "\"CompressorStatus\":true,";
  payload += "\"DoorStatus\":false,";
  payload += "\"DeviceBatteryLevel\":95";
  payload += "}";

  // Send data to Zoho IoT
  zohoClient.publishTelemetry(payload);

  delay(60000); // Send data every minute
}
For Linux-based gateways or Raspberry Pi:
# Download and install Zoho IoT SDK for C
curl -L -o zoho-iot-sdk-c.zip https://github.com/zoho/zoho-iot-sdk-c/archive/refs/tags/0.1.2.zip
unzip zoho-iot-sdk-c.zip
cd zoho-iot-sdk-c-0.1.2

# Configure and build
mkdir build && cd build
cmake ..
make

# Edit configuration with your MQTT credentials
nano projects/basic/basic.c
# Update MQTT_USER_NAME and MQTT_PASSWORD

# Compile and run
./projects/basic/basic
Step 3.3: Verify Device Connectivity
- Return to Zoho IoT User Application
- Navigate to Devices > Select your device
- Check the Device Status indicator - it should show Connected (green)
- Click on Live Data tab to see real-time telemetry
- Verify that temperature and humidity values are updating
Troubleshooting Tips:
- If device shows “Disconnected”, verify MQTT credentials
- Check firewall settings - MQTT typically uses port 8883 for secure connections
- Enable debug logging in your device code to see connection attempts
- Verify TLS certificates are properly configured
Phase 4: Setting Up Asset Hierarchy
For better organization, create an asset hierarchy that represents your physical infrastructure.
Step 4.1: Create Location Models
- Go to Developer Portal > Models > Location Models > Create New
- Name it: “ColdStorageWarehouse”
- Add custom fields:
- Address
- Manager Name
- Total Units
- Emergency Contact
Step 4.2: Create Asset Models
- Create a model called “RefrigerationUnit”
- Define fields:
- Manufacturer
- Model Number
- Installation Date
- Maintenance Schedule
- Assigned Devices (link to device model)
Step 4.3: Build the Hierarchy
- Navigate to User Application > Locations
- Create three locations: Warehouse A, B, and C
- Under each location, add Assets (RefrigerationUnits)
- Associate devices with their respective assets
- This creates a logical tree: Location > Asset > Device
Phase 5: Creating Alarm Rules
Alarms are critical for monitoring compliance and responding to issues promptly.
Step 5.1: Configure Temperature Threshold Alarms
- Navigate to Developer Portal > Automation > Alarm Rules
- Click Create Alarm Rule
- Configure High Temperature Alarm:
- Rule Name: HighTemperatureAlert
- Applies To: ColdStorageTemperatureSensor (all devices)
- Condition: Temperature > -20°C
- Severity: Critical
- Duration: Trigger if condition persists for 5 minutes
- Create Low Temperature Alarm similarly:
- Condition: Temperature < -30°C
- Severity: High
Step 5.2: Set Up Notification Profiles
- Click Notification Profiles > Create New
- Configure notification channels:
- Email: Send to maintenance team email list
- SMS: Send to on-call manager
- Webhook: Integrate with Slack or Microsoft Teams
- Set escalation rules:
- If alarm not acknowledged within 15 minutes, escalate to facility manager
- If alarm persists for 1 hour, escalate to executive team
Step 5.3: Create Predictive Maintenance Alarms
- Create an alarm for compressor performance:
- Condition: CompressorStatus = false for > 30 minutes
- Action: Create maintenance ticket automatically
Phase 6: Building Dashboards
Dashboards transform raw data into visual insights.
Step 6.1: Create a Global Dashboard
This provides an overview of all devices across all locations.
- Navigate to Developer Portal > Dashboards > Create Dashboard
- Name it: “Cold Storage Overview”
- Set dashboard type: Global Dashboard
Step 6.2: Add Widgets
Zoho IoT offers various widget types. Add these widgets:
1. KPI Cards (Top Row)
- Total Devices Online/Offline count
- Average Temperature across all units
- Active Alarms count
- Units requiring maintenance
Configuration:
- Widget Type: KPI Card
- Data Source: Aggregate from all devices
- Refresh Interval: 30 seconds
2. Real-Time Temperature Chart (Middle Row)
- Widget Type: Line Chart
- Data Points: Temperature from last 24 hours
- Group By: Location
- Y-Axis: Temperature (°C)
- X-Axis: Time
- Show thresholds: Draw lines at -20°C and -30°C
- Enable live updates
3. Device Status Map (Middle Row)
- Widget Type: Geo Map
- Data Source: Device locations with GPS data points
- Color coding: Green (normal), Yellow (warning), Red (critical)
- Click behavior: Show device details popup
4. Humidity Gauge (Bottom Row)
- Widget Type: Gauge
- Data Source: Current humidity reading
- Min: 0%, Max: 100%
- Color ranges: 0-40% (Low), 40-70% (Normal), 70-100% (High)
5. Alarm History Table (Bottom Row)
- Widget Type: Data Table
- Columns: Timestamp, Device Name, Alarm Type, Severity, Status
- Filters: Date range, severity, location
- Actions: Acknowledge alarm, view details
6. Heatmap (Side Panel)
- Widget Type: Heatmap
- Shows temperature distribution across all devices
- Easy identification of hot spots
Step 6.3: Create Location-Specific Dashboards
- Create separate dashboards for each warehouse
- Use Module-Specific Dashboard type
- Apply filters to show only devices from that location
- Customize widgets based on warehouse-specific requirements
Step 6.4: Create Mobile-Friendly Dashboard
- Enable Responsive Design mode
- Rearrange widgets for mobile viewing
- Prioritize critical information at the top
- Test on different screen sizes
Step 6.5: Configure Dashboard Permissions
- Go to Dashboard Settings > Permissions
- Create different views for different roles:
- Executives: High-level KPIs only
- Operations Team: Full dashboard access
- Maintenance Team: Focus on alarm and device health widgets
- Set up role-based access control (RBAC)
Phase 7: Setting Up Automation and Workflows
Step 7.1: Create Workflow Rules
- Navigate to Automation > Workflow Rules > Create New
- Automated Maintenance Ticket Creation:
- Trigger: When alarm “HighTemperatureAlert” is raised
- Action: Create record in Zoho Desk (or your ticketing system)
- Include: Device details, current reading, alarm history
Step 7.2: Configure Cloud Data Flow
- Go to Cloud Data Flow > Create Flow
- Build a data pipeline:
- Source: Temperature data point
- Transform: Calculate rolling 24-hour average
- Enrich: Add location weather data via API
- Destination: Store in Zoho Analytics for trend analysis
Step 7.3: Set Up Auto-Remediation
- Create a workflow to automatically attempt fixes:
- Trigger: Temperature alarm + CompressorStatus = false
- Action: Send ResetCompressor command to device
- Wait: 10 minutes
- Evaluate: Check if temperature normalizing
- If still critical: Escalate to human intervention
Phase 8: Analytics and Reporting
Step 8.1: Connect to Zoho Analytics
- Navigate to Integrations > Zoho Analytics
- Click Connect and authorize access
- Select data to sync:
- All device telemetry data
- Alarm history
- Device metadata
Step 8.2: Create Custom Reports
- In Zoho Analytics, create reports for:
- Compliance Report: Temperature compliance percentage per device
- Downtime Analysis: Device offline duration and frequency
- Energy Efficiency: Correlate temperature maintenance with power consumption
- Predictive Maintenance: Identify devices with degrading performance
Step 8.3: Schedule Automated Reports
- Set up daily compliance reports emailed to quality assurance team
- Weekly performance summary for operations managers
- Monthly executive dashboard with key trends
Phase 9: Advanced Features Implementation
Step 9.1: Implement Edge Computing
For reduced latency and bandwidth optimization:
- Configure Edge Automation in Developer Portal
- Define edge processing rules:
- Average temperature readings locally before sending to cloud
- Filter out noise and outliers
- Store data locally during connectivity issues
Step 9.2: Set Up Device Simulation
For testing and training purposes:
- Use Zoho IoT’s Device Simulator
- Create simulated devices that mimic real sensor behavior
- Test alarm rules and dashboard updates without physical hardware
Step 9.3: API Integration
Integrate with existing enterprise systems:
# Python example: Fetch device data via Zoho IoT API
import requests

api_url = "https://iot.zoho.com/api/v1/devices"
headers = {
    "Authorization": "Zoho-oauthtoken YOUR_ACCESS_TOKEN",
    "Content-Type": "application/json"
}

# Get all devices
response = requests.get(api_url, headers=headers)
devices = response.json()

# Get specific device data
device_id = "ColdStorage-Unit-01-Warehouse-A"
device_url = f"{api_url}/{device_id}/data"
device_data = requests.get(device_url, headers=headers).json()

print(f"Current Temperature: {device_data['Temperature']}°C")
Phase 10: Testing and Deployment
Step 10.1: Comprehensive Testing
Connectivity Testing:
- Verify all 20 devices are online
- Test connection resilience (simulate network interruptions)
- Validate data transmission rates
Alarm Testing:
- Manually trigger threshold violations
- Verify notifications are received
- Test escalation workflows
Dashboard Testing:
- Verify real-time updates
- Test on multiple browsers and mobile devices
- Check dashboard load times with full device count
Performance Testing:
- Simulate high data volume scenarios
- Test with all devices sending data simultaneously
- Monitor system response times
Step 10.2: User Training
- Create user documentation with screenshots
- Conduct training sessions for different user groups:
- Operations team: Daily monitoring and alarm response
- Maintenance team: Device management and troubleshooting
- Management: Dashboard interpretation and reporting
Step 10.3: Phased Rollout
Phase 1: Deploy to Warehouse A (pilot location)
- Monitor for 2 weeks
- Gather user feedback
- Identify and fix issues
Phase 2: Expand to Warehouse B
- Apply lessons learned from pilot
- Continue monitoring and optimization
Phase 3: Full deployment to all locations
- Comprehensive monitoring
- 24⁄7 support during initial period
Step 10.4: Establish Monitoring and Maintenance Procedures
Daily health checks:
- Verify all devices online
- Check for any unacknowledged alarms
- Review dashboard for anomalies
Weekly maintenance:
- Review alarm trends
- Optimize threshold settings based on historical data
- Update device firmware as needed
Monthly reviews:
- Analyze compliance reports
- Identify improvement opportunities
- Plan capacity expansion
Best Practices and Pro Tips
Here are some points that will always help you make a better product.
Security Best Practices
- Enable Two-Factor Authentication for all Zoho IoT user accounts
- Use TLS/SSL encryption for all device communications
- Rotate MQTT credentials every 90 days
- Implement IP whitelisting for known device locations
- Regular security audits of access logs and user permissions
Performance Optimization
- Batch data transmissions - Instead of sending every reading immediately, batch data points to reduce bandwidth
- Use edge processing - Perform initial data filtering and averaging at the edge
- Optimize polling intervals - Balance between real-time needs and system load
- Archive historical data - Move older data to long-term storage to keep dashboards responsive
Dashboard Design Tips
- Follow the 5-second rule - Users should understand critical information within 5 seconds
- Use color coding consistently - Green = good, Yellow = warning, Red = critical
- Prioritize information - Most critical metrics at the top
- Avoid clutter - Show only essential information on main dashboard
- Mobile-first design - Many users will access dashboards on smartphones
Cost Optimization
- Right-size your plan - Start with the appropriate tier based on device count
- Optimize data transmission frequency - Not all data points need second-by-second updates
- Use data retention policies - Archive old data to reduce storage costs
- Leverage device modeling - One model can support hundreds of devices
Troubleshooting Common Issues
Device Won’t Connect
- Check credentials: Verify MQTT username and password are correct
- Network connectivity: Ensure device has internet access and can reach mqtt.zoho.com:8883
- Firewall rules: Whitelist Zoho IoT endpoints
- TLS certificates: Ensure device time is synchronized (required for certificate validation)
Data Not Appearing in Dashboard
- Verify data format: Check that JSON payload matches defined data points exactly
- Check data point mapping: Ensure field names in payload match model configuration
- Review device logs: Look for transmission errors or rejections
- Validate dashboard filters: Remove filters to see if data appears
Alarms Not Triggering
- Review alarm conditions: Verify thresholds are set correctly
- Check alarm rule status: Ensure rule is published and active
- Verify notification profiles: Test email/SMS channels independently
- Review duration settings: Alarm may require condition to persist for specified time
Dashboard Performance Issues
- Reduce widget count: Too many widgets can slow rendering
- Optimize refresh intervals: Not all widgets need real-time updates
- Use filtered dashboards: Create separate dashboards for different purposes
- Archive old data: Move historical data to analytics platform
Conclusion: Transform Your Operations with Zoho IoT
Building an IoT solution from scratch can be daunting—from selecting hardware to writing device firmware, establishing connectivity, processing data, and creating meaningful visualizations. Zoho IoT eliminates much of this complexity with its comprehensive low-code platform that handles the heavy lifting while giving you flexibility where you need it.
In this guide, we’ve walked through implementing a complete temperature monitoring system for cold storage facilities, but the principles apply across industries and use cases—whether you’re monitoring industrial equipment, tracking fleet vehicles, managing smart buildings, or optimizing energy consumption.
The key advantages of choosing Zoho IoT include:
- Rapid deployment - From concept to production in weeks, not months
- Scalability - Start with a few devices and grow to thousands seamlessly
- Integration - Native connectivity with Zoho’s business applications and third-party systems
- Security - Enterprise-grade protection for your IoT data and devices
- Total cost of ownership - Predictable pricing without hidden infrastructure costs
iThing

Another end of the spectrum is iThing - another kind of IoT dashboard that configures everything for you. A wonderful product from Addmechatronics, iThing brings out the best of what you need - out of the box.
They take care of the entire spectrum of the application - from the PLCs to the dashboard. All you need is some drag and drop; and the devices are ready to monitor your factory and track the vital parameters, raising alarms when required.
Have questions about implementing IoT for your specific use case? Do connect with us, and let’s discuss how IoT can transform your operations!